Connecting Arduino to Elixir via Circuits.UART: Real-Time Serial Monitoring


Subscribe to receive Elixir news to your inbox every two weeks.
Expand your skills
Download free e-books, watch expert tech talks, and explore open-source projects. Everything you need to grow as a developer - completely free.
While Elixir isn't the programming language most commonly associated with embedded software development, it offers features that could make it an unexpectedly good choice in this domain. The qualities for which we appreciate Elixir so much - concurrency and fault tolerance - also play a key role in more complex embedded systems, where multiple tasks must run in parallel and recover gracefully from failures.
In this post, I'd like to demonstrate a fairly basic application of Elixir for embedded systems. I will use the Arduino Uno board as the hardware to read a sensor and send data to the Elixir app on our PC via a serial connection. We must remember that in such a small-scale project, using Elixir may be an overkill, so it should be treated rather as an exemplary entry point to start playing with it in the embedded domain than a real-case scenario. Yet, the techniques I'll use - handling serial communication, parsing data, maintaining sliding windows, and calculating statistics in real-time - surely could be building blocks for a more complex project.
Connecting Arduino microcontroller with Elixir: reasons and challenges
Before we start, let's examine the benefits and difficulties of using Elixir to read data from an Arduino microcontroller.
Possible reasons:
- Integration with larger systems - for sure, one of the main reasons here would be using the Arduino data in projects that already use Elixir. It'd not only make the ecosystem simpler, but also let programmers already accustomed to Elixir write code faster and without additional learning.
- Real-time monitoring and analysis - in Elixir, you can stream incoming serial data into processes that immediately transform, filter, or visualise it, e.g. with the use of the LiveView library.
- Fault-tolerant pipelines - Elixir is known for handling crashes and restarts without taking down the system, and could be valuable in more complex embedded systems that deal with unreliable sensors, unstable Arduino pins or intermittent connections.
Possible challenges:
- Performance trade-offs - deciding what should be computed on the Arduino (low latency, less bandwidth) vs in Elixir (flexibility, more CPU power).
- Resource mismatch - as Arduino has rather limited memory/CPU, and the Elixir side can be more powerful, the protocols should be designed considering this.
- Tooling gap, shortage of resources - as using Elixir for embedded systems is quite niche, there will possibly still be cases when some knowledge of C/C++ will be needed. The code uploaded to Arduino Uno is one of the examples. Additionally, there are rather few resources and community support in this area.
Equipment and setup
In my case study, I will use the following components to build a complete system:
- Arduino Uno board (you can replace it with Arduino Nano, if you prefer).
- LDR (Light Dependent Resistor) sensor.
- Several wires + ~10 kΩ resistor (only for LDR).
- Breadboard (not necessary, but helpful, especially when you need extra space for connecting components).
- USB cable for connecting the Arduino board.
- Arduino IDE installed on macOS.
We should connect one end of the LDR to the 5V power supply pin of our Arduino, and the other end to one of the analog pins (I chose A0) through a resistor. The free end of the resistor should be connected to the GND pin. Finally, we connect the microcontroller to the USB port of our computer.
Data protocol: simple and robust
The first thing we should do in case of Arduino-Elixir serial communication is to establish the protocol on which it'll be based. Arduino sends raw bytes, and Elixir is supposed to receive data, which means we need to decide on a consistent format to keep everything clear and ensure reliable data transfer.
We have two main types of fitting protocols - CSV and NDJSON. CSV is the simplest one - here we have columns separated by commas and every frame is situated on a new line. The example representing frame, timestamp and value is:
42,0.210,678The NDJSON is slightly more complex. Here, every line is a new JSON object. The above example in this protocol looks like this:
"frame":42,"t":0.210,"value":678}In our case, we'll stick with CSV for ease of creation and Elixir-side parsing. This approach makes transmitting data lightweight and keeps the parsing logic in Elixir simple.
Arduino: data streaming
As I mentioned earlier, we'll still need some amount of C++ to use the Arduino board. Yet, the code will be quite easy to write, using Arduino's native language (simplified C++). It's based on two main functions:
void setup() { ... }
void loop()  { ... }
The first one is executed once, just after the program starts, while the second one defines the processes in an unfinished loop. So, considering our protocol for transmitting data, the code for Arduino should look like this:
const unsigned long PERIOD_US = 20000;
unsigned long next_ts = 0;
unsigned long frame = 0;

void setup() {
  Serial.begin(115200);
  analogReference(DEFAULT);
  next_ts = micros();
}

void loop() {
  unsigned long now = micros();
  if ((long)(now - next_ts) >=0 ) {
    int raw = analogRead(A0);
    float t = now / 1000000.0;
    Serial.print(frame);
    Serial.print(',');
    Serial.print(t, 6);
    Serial.print(',');
    Serial.println(raw);
    frame++;
    next_ts += PERIOD_US;
  }
}
Firstly, we define a constant PERIOD_US, which sets the sampling period as 20000 microseconds (equivalent to 50 Hz - enough for our simple case, but of course can be higher in more precise systems), indicating to our program how often it should read data from our sensor. The other variables - next_ts and frame - hold the time for the next reading and the counter of already sent samples.
Our setup() function initialises the serial communication at a 115200 baud rate, which is a common choice for Arduino Uno projects. This establishes a serial connection that allows the board to transmit data and receive data efficiently. Then, we set the analog reference to DEFAULT (5V on a typical Arduino board). We also use Arduino native micros() function, which returns the number of microseconds since the current program started.
At the start of each loop iteration, we check if it's time for the next sample. If so, we read the value from the A0 analog pin (one of the standard Arduino Uno pins, which in our example acts as the input channel for the sensor) and send this output as three comma-separated values over the serial port: the frame counter, the timestamp in seconds, and the raw sensor data.
To see if everything works as expected, we should create a sketch with the above code in the Arduino IDE, upload it to our Arduino Uno, and open the Serial Monitor window. If we see our data transfer logged, we are good to go.
Elixir: Circuits.UART i GenServer for streaming
In this section, we'll build the Elixir side of our app - a UART stream reader. We'll open the port, parse the CSV data, and calculate the median of our samples. We'll start by adding the Circuits.UART library to our dependencies (of course, we need to install Erlang/Elixir and set up our project first - I suggest setting it up with mix phx.new as we'll use LiveView in the next steps):
defp deps do
  [
    ...
    {:circuits_uart, "~> 1.5"}
  ]
end
Then, we need to write a simple GenServer for reading our data and creating statistics:
defmodule ArduinoLive.SerialMonitor do
  use GenServer
  alias Circuits.UART

  @window_size 100

  def start_link(port) do
    GenServer.start_link(__MODULE__, port, name: __MODULE__)
  end

  def init(port) do
    {:ok, uart} = UART.start_link()

    case UART.open(uart, port,
           speed: 115_200,
           active: true,
           framing: {Circuits.UART.Framing.Line, separator: "\n"}
         ) do
      :ok ->
        IO.puts("UART opened on #{port}")

        {:ok,
         %{
           uart: uart,
           queue: :queue.new(),
           sum: 0.0,
           n: 0,
           last_frame: nil,
           drops: 0
         }}

      {:error, reason} ->
        IO.puts("Failed to open #{port}: #{inspect(reason)}")
        {:stop, reason}
    end
  end

  def handle_info({:circuits_uart, _port, line}, state) when is_binary(line) do
    case String.split(String.trim(line), ",", parts: 3) do
      [frame_s, _t_s, value_s] ->
        with {:ok, frame} <- parse_int(frame_s),
             {:ok, value} <- parse_float(value_s) do
          drops =
            state.drops + if state.last_frame && frame != state.last_frame + 1, do: 1, else: 0

          {queue, sum, n} =
            slide_window(state.queue, state.sum, state.n, @window_size, value)

          mean = if n > 0, do: sum / n, else: 0.0
          median = calc_median(queue)

          IO.puts(
            "frame=#{frame} value=#{Float.round(value, 3)} " <>
              "mean=#{Float.round(mean, 3)} median=#{Float.round(median, 3)} drops=#{drops}"
          )

          new_state = %{
            state
            | queue: queue,
              sum: sum,
              n: n,
              last_frame: frame,
              drops: drops
          }

          {:noreply, new_state}
        else
          _ -> {:noreply, state}
        end

      _ ->
        {:noreply, state}
    end
  end

  def handle_info(_other, state), do: {:noreply, state}

  defp slide_window(queue, current_sum, current_size, max_size, new_value) do
    updated_queue = :queue.in(new_value, queue)

    if current_size < max_size do
      {updated_queue, current_sum + new_value, current_size + 1}
    else
      {{:value, oldest_value}, trimmed_queue} = :queue.out(updated_queue)
      {trimmed_queue, current_sum + new_value - oldest_value, current_size}
    end
  end

  defp calc_median(queue) do
    list = :queue.to_list(queue)
    len = length(list)

    cond do
      len == 0 ->
        0.0

      rem(len, 2) == 1 ->
        list |> Enum.sort() |> Enum.at(div(len, 2))

      true ->
        sorted = Enum.sort(list)
        mid = div(len, 2)
        (Enum.at(sorted, mid - 1) + Enum.at(sorted, mid)) / 2
    end
  end

  defp parse_int(s) do
    case Integer.parse(s) do
      {i, _} -> {:ok, i}
      _ -> :error
    end
  end

  defp parse_float(s) do
    case Float.parse(s) do
      {f, _} -> {:ok, f}
      _ -> :error
    end
  end
end
Now, let's look at what's going on in here. The start_link/1 function starts a GenServer with the USB port path as an argument (we can find the proper path by typing Circuits.UART.enumerate() in the console).
In the init/1 one, we start the UART connection (UART.start_link/0) and open the port (UART.open/3) with the speed corresponding to the baud rate set earlier in the Arduino code and framing set to Circuits.UART.Framing.Line to ensure that we receive single lines instead of the bulked data (for other approaches, see documentation here: https://hexdocs.pm/circuits_uart/Circuits.UART.Framing.html). Also, we initiate the state here with:
- queue - for keeping the window of the last samples (in our case, 100 defined in @window_size), which is necessary to calculate the median
- sum and n - accumulator for calculating the mean
- last and drops - for finding out the lost frames (these happen quite often in case of the serial communication and inexpensive cables)
The handle_info/2 takes care of our main logic - it receives a message with the line being a string representing our sample. With String.trim/2 we remove possible \r from our line and then parse our data. Every message is sent asynchronously, following the standard GenServer's behaviour. We check if there are any drops and determine whether our sliding window is full with the helper function slide_window/5.
Eventually, we calculate the mean (based on the sum and the number of elements - n) and the median (based on the sorted queue content), which provides us with two statistical filtering methods for the sensor reading. Finally, we log our results in the console, providing a clear output of the processed data stream..
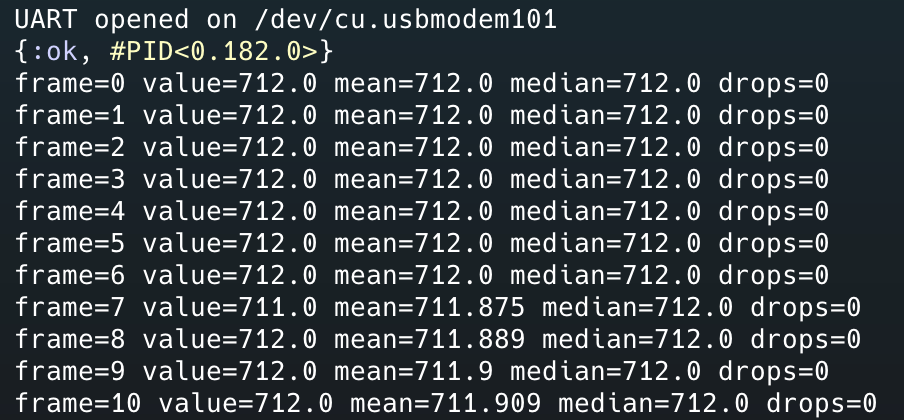
Now we can test our implementation by typing our start_link/1 function in the console with the proper serial port path as the argument. In my case, it'll be SerialDemo.SerialMonitor.start_link("/dev/cu.usbmodem101"). Upon examining our logged data, we can see that our code functions as expected.
Real-time preview: PubSub and LiveView
To make our data more readable and ready for use in charts and dashboards, we can use PubSub to broadcast each new sensor sample to our app and show the real-time visualisations with the help of Phoenix LiveView.
In order to do that, in the handle_info/2 we need to add the following code:
Phoenix.PubSub.broadcast(
  ArduinoLive.PubSub,
  "serial:data",
  {:serial_data, %{last: value, mean: mean, median: median, window: :queue.to_list(queue)}})
In the next step, we'll write a simple LiveView layout to visualise our collected data. LiveView will receive data from PubSub and render a small chart of the streaming serial data. To do that, we need to add the LiveView module, when we put our logic (handling our collected data with the use of the PubSub) and template (rendering our values and chart):
defmodule ArduinoLiveWeb.StreamLive do
  use ArduinoLiveWeb, :live_view

  def mount(_params, _session, socket) do
    if connected?(socket), do: Phoenix.PubSub.subscribe(ArduinoLive.PubSub, "serial:data")

    {:ok,
     assign(socket,
       last: nil,
       mean: 0.0,
       median: 0.0,
       series: []
     )}
  end

  def handle_info({:serial_data, data}, socket) do
    {:noreply,
     socket
     |> assign(:last, data.last)
     |> assign(:mean, data.mean)
     |> assign(:median, data.median)
     |> assign(:series, data.window)}
  end
end
<div class="space-y-2" style="font-family: system-ui, sans-serif; padding: 1rem">
<h2>Real-time stream</h2>
<div>Value: <%= @last %></div>
<div>Mean: <%= Float.round(@mean || 0.0, 3) %></div>
<div>Median: <%= Float.round(@median || 0.0, 3) %></div>
<svg width="600" height="120" viewBox="0 0 600 120" preserveAspectRatio="none" style="margin-top:8px;border:1px solid #ddd">
<% series = Enum.take(@series, -100) %>
<% len = max(length(series), 1) %>
<% minv = Enum.min(series, fn -> 0 end) %>
<% maxv = Enum.max(series, fn -> 1 end) %>
<% range = max(maxv - minv, 1) %>
<% points =
series
|> Enum.with_index()
|> Enum.map(fn {v, i} ->
x = trunc(i * (600 / max(len - 1, 1)))
y = 120 - trunc((v - minv) * 120 / range)
"#{x},#{y}"
end)
|> Enum.join(" ")
%>
<polyline points={points} fill="none" stroke="currentColor" stroke-width="2"/>
</svg>
</div>Then, we need to add the route in our router.ex file:
scope "/", ArduinoLiveWeb do
    pipe_through :browser
    live "/stream", StreamLive
end
The last step is to start our SerialMonitor in the application.ex file:
children = [
...,
ArduinoLiveWeb.Endpoint,
{ArduinoLive.SerialMonitor, "/dev/tty.usbmodem101"}
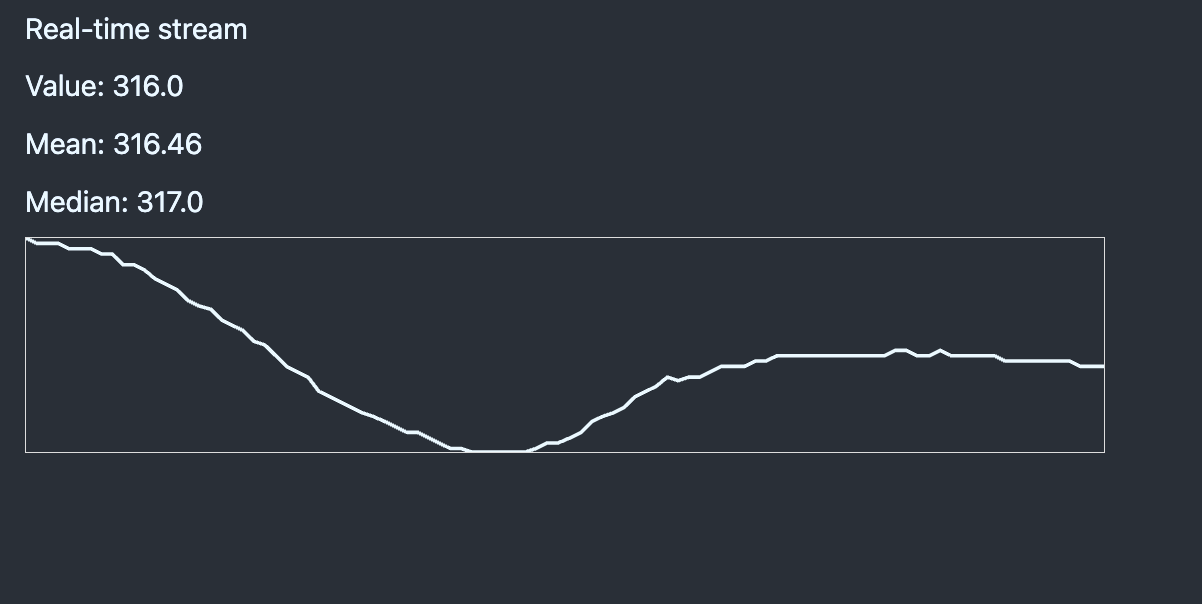
]The result is a simple interface showing the real-time output of all the information we generated in a readable form:
Summary
As we can see in our example, connecting Arduino to Elixir via Circuits.UART is quite straightforward to write, and in a short time, we can have a working real-time dashboard for our sensors. Of course, this easy project is only an entry point, as our possibilities are considerably broader - we can add more complex signal filtering and processing, integrate it with external databases and APIs, and enhance our front-end with more intricate and advanced visualisations.
What's more, we can "replace" our PC side with a platform such as Raspberry Pi to create an independent monitoring hub, as we can also use Circuits.UART library on such devices. In more advanced projects, one might connect additional components to the Arduino Uno board, making use of SCL pins for I²C devices or applying SPI communication for higher-speed data transfer, both of which can also be handled on the Elixir side with libraries from the Nerves and Circuits ecosystem (e.g., Circuits.I2C, Circuits.SPI).
Want to power your product with Elixir? We’ve got you covered.
Related posts
Dive deeper into this topic with these related posts
You might also like
Discover more content from this category

No application can function without data, and sometimes your data lives in a spreadsheet. Let's see what can we do to change this sorry state of affairs and how can we move it into an actual database.

Elixir is a pretty capable language - and it consistently ranks near the top of most loved and wanted languages rankings.

The Elixir programming language has gained popularity recently due to its simplicity and efficiency. As a result, many SaaS companies are now using Elixir & Phoenix as the base of their technology stack.